Running it · Chapter 15
Home Assistant.
Someone requests a film, your phone speaks up, two buttons, done. That is the core of the integration for Home Assistant. The rest is a bonus: every Radarr and Sonarr instance as a device of its own, the media servers beside them, the household’s quotas and a calendar of what is coming out soon. The integration is a project of its own under the MIT licence, with its own version numbers, its own tests and its own issue tracker. This chapter shows how to set it up.
Everyone connects for themselves
The unusual part first: there is no house-wide connection that everybody looks into. Each person enters their own key in their own Home Assistant and gets their own figures. Whoever runs a Home Assistant of their own in the same household gets theirs, and neither sees the other’s.
The key decides what appears. The rights of an API token hang on the account it belongs to. The integration first asks what a key may do and creates only what fits. A personal key yields a handful of entries, an administrator’s key everything. Nothing sits there greyed out, nothing answers a press with a refusal. A key marked “May only read” is enough for everything that shows and also for notifications. It gets no buttons and may not decide a request, but it is notified.
Setting up
- Get the integration
It is not in Home Assistant’s catalogue but in a project of its own. In HACS you add it once as a custom repository: HACS, the three dots, “Custom repositories”, address
DerKezorm/nexview-homeassistant, category “Integration”. Then you install it, restart Home Assistant and choose “Devices & services” and the integration “Nexview”. After that it is updated like everything else. - Create the key
In Nexview open “Profile › Account › Security” and create one under “API tokens” with “Create token”. Give it a name you will recognise later, such as “Home Assistant”. It starts with
nxv_and is shown exactly once, so copy it at once. The integration calls the section “Access keys” in its dialogue, the same thing is meant. - Connect
In Home Assistant enter the “Address” at which Nexview answers, such as
http://nexview.local:5173, and the “Access key”. That is all. What comes of it depends on the account the key belongs to.
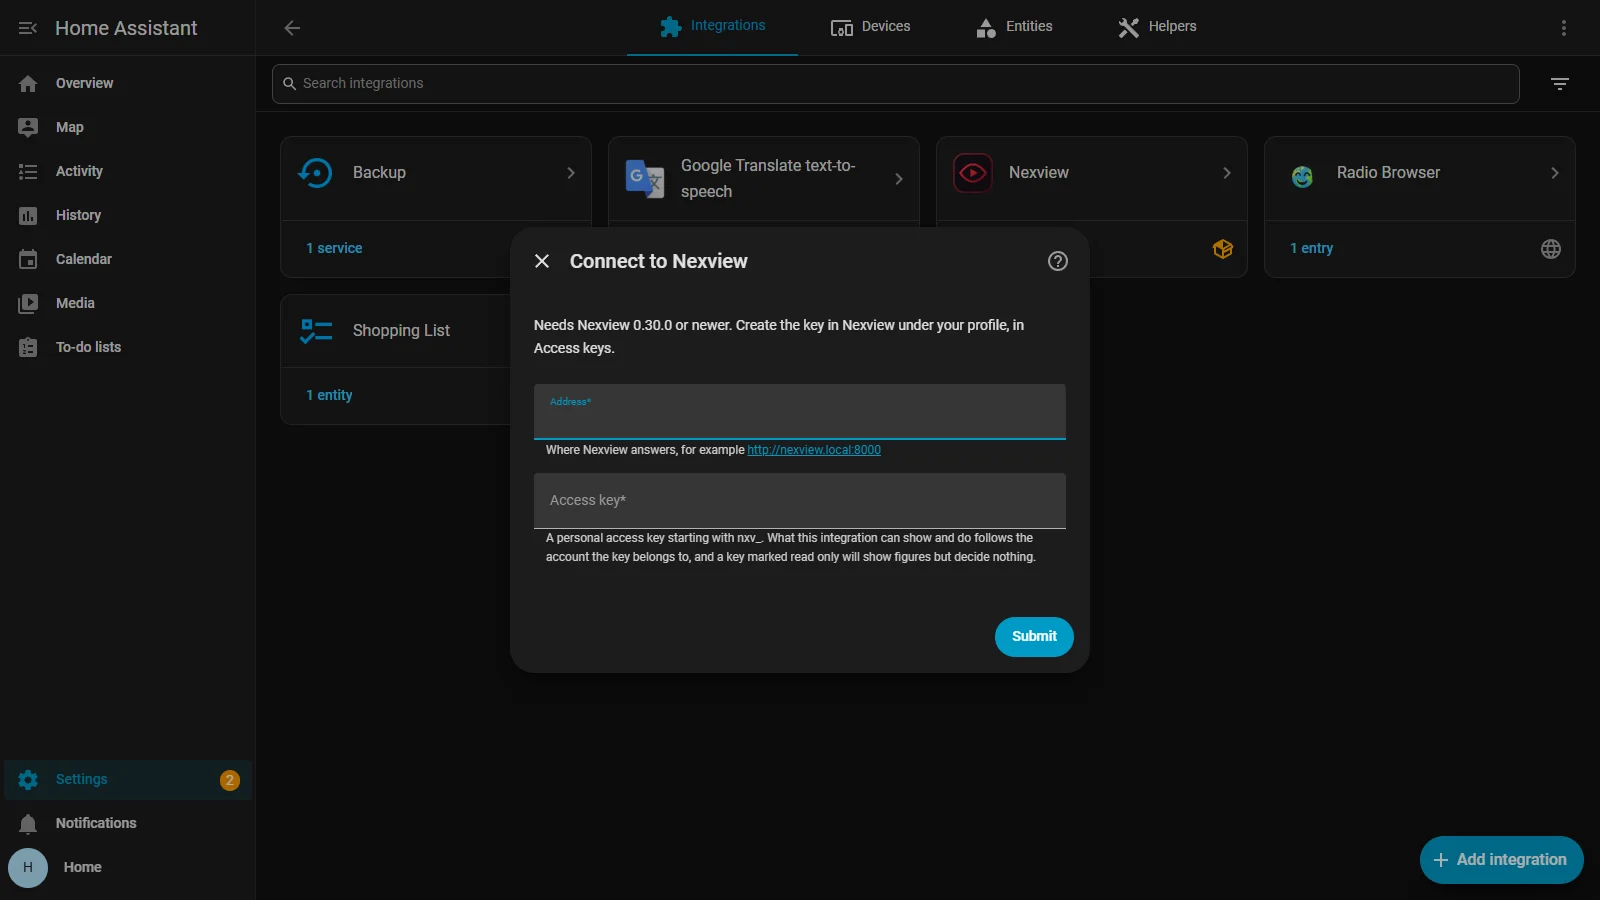
What is needed is Nexview 0.30.0 or newer and Home Assistant 2026.3 or newer. A Nexview installation that is too old is turned away by the integration with a sentence that names the reason, instead of an error nobody can read. How to give the address behind a proxy is in the chapter Behind a proxy.
What appears
One entry in Home Assistant, but not one device: what Nexview keeps apart is kept apart over there too. If an instance goes or one is added, the list grows and shrinks with it, without a restart.

- Nexview itself. The house at a glance and the account’s own figures: quota and usage, unread notifications, own open tickets. With an administrator’s key the values for the whole house join: waiting requests, requests in progress, failures in the last seven days, findings by severity, free and used storage. Plus the calendar “Upcoming”, three event entities (requests, storage, operations) and the update notice. All values keep history.
- Every Radarr and every Sonarr as a device of its own under Nexview, with “Reachable”, “Problems”, “Version”, “Queue” and “Stuck in queue” and the button “Test connection”. Whoever runs two Radarr, one of them for 4K, sees both apart. Home Assistant never talks to them itself, always through Nexview.
- Every media server. Plex, Jellyfin and Emby get one each: how many titles are on it, how many streams are running and how many of those the server is converting.
- Selected accounts. Quotas and usage per person. Without a selection nothing appears here, which is deliberate: an installation with thirty accounts should not be flooded with two hundred values. The selection lives in the integration’s options.
Where there is no limit there is no entry. Whoever has no quota gets no remaining value that says “unavailable” for good. What an administrator requests belongs to the house in Nexview, so their used storage does not appear at all. Every single entity is explained on the project’s page on GitHub.
Deciding from your phone
This is why the integration exists. Nexview tells Home Assistant that somebody requested something, your phone shows it with two buttons, and the answer goes straight back. For that the integration registers a target with Nexview during setup, and Nexview sends by itself instead of Home Assistant having to ask at intervals. It sets that up by itself, and it intercepts the four-digit confirmation code Nexview demands for every target. You type nothing between two windows.
That target belongs to your key and nobody else’s. It carries exactly what your bell in Nexview would show: your requests, your tickets, your storage. You see the address in Nexview under “Profile › Account › Security”, next to the key that registered it, and you disconnect it there with “Stop notifying”. An administrator sees all registered targets at once under “Settings › Notifications” in the section “Callbacks”.
If Nexview cannot reach Home Assistant, everything keeps working, only slower, and a repair notice in Home Assistant names the reason. An automation that answers a waiting request looks like this:
automation:
  - alias: Nexview request waiting
    triggers:
      - trigger: event.received
        target:
          entity_id: event.nexview_requests
        options:
          event_type: pending
    actions:
      - action: notify.mobile_app_your_phone
        data:
          title: "{{ trigger.to_state.attributes['title'] }}"
          message: "{{ trigger.to_state.attributes['body'] }}"
          data:
            actions:
              - action: NEXVIEW_APPROVE
                title: Approve
              - action: NEXVIEW_REJECT
                title: Reject
Two details that cost an evening. target: is not optional, the entity goes underneath it and not beside it, otherwise the editor says “no target set” and refuses to save. And the event arrives as a state change, not as a bus event: its fields live in trigger.to_state.attributes, and trigger.event.data does not exist. Use square brackets, because attributes.title resolves to the string method title rather than the field.
You wire up the two buttons with a second automation that listens for mobile_app_notification_action and calls nexview.approve_request or nexview.reject_request. Every event carries title, body, level, url (where it points inside Nexview), image and nexview_event with the name Nexview used. The same shape applies to event.nexview_operations with event_type: ticket for a new ticket and event.nexview_storage with release_requested when somebody has handed a title back.
Good to knowIf url points somewhere unexpected, check Nexview’s public address under “Settings › System › Address”. Nexview builds the link itself, and a wrong address sends every notification there, not only the one to Home Assistant.
Actions
What an automation can do is available as an action, not as a switch. Only someone whose key may decide can decide. The reading actions work with any key.
| Action | What it does |
|---|---|
approve_request | Approve a request. |
reject_request | Reject a request, with a reason if you like. |
defer_request | Put a request on hold instead of rejecting it. |
cancel_request | Cancel a running request. |
list_requests | Fetch the waiting requests, with title, account and date. |
search | Search Nexview for a title. |
active_downloads | What is downloading right now, with progress. |
get_quota | Ask for an account’s quota. |
now_playing | Who is watching what right now. |
Who is watching what is deliberately not an entity. It comes from an action, because it belongs to the moment somebody asks, not in a database that keeps everything for years.
What is deliberately missing
- You cannot set anything. No switches for accounts, none for quotas, no resetting. Everything is read, requests are decided, and a few operator actions exist as buttons: check for updates, run the storage reconciliation, mark findings as seen. Buttons exist only with write permission. An automation that goes wrong at three in the morning should not be able to touch anything else.
- Child accounts do not appear. In Nexview they are sub-profiles of their parents, and their names and wishes do not belong in a database that records everything for ever. A child’s wish triggers an event for the parents, nothing more.
- Requesting does not work. Deciding happens in Home Assistant, searching too, but requesting happens in Nexview. A request has consequences for a quota, and that belongs where you can see what you trigger.
- One entry per account. The same Nexview can be added twice with two keys, the same account twice cannot.
- One language per callback. The integration asks for the language this Home Assistant is set to. If the language changes later, the target keeps the old one until you set the entry up again.
Removing it
Delete the entry in Home Assistant. That takes entities and devices with it and unregisters the target. Two things stay behind in Nexview for you to tidy: in the profile you revoke the key (“Revoke”), which also disconnects the target. Under “Settings › Notifications” there may also be a webhook target named “Home Assistant (…)”. If you do not delete it, Nexview keeps calling an address that no longer listens and fills its outbox with failures.
Good to knowIf only “Reachable” appears: the key decides what exists. In Home Assistant download the entry’s diagnostics. They say what the key may do. If it is “read only”, it can only show figures. A figure that says “unavailable” is the right answer for a quota: the account has no limit, so nothing is left over that could be counted.
Next comes moving from another system: Moving from Seerr. The Home Assistant page under Features sums up the integration, and the project itself is on GitHub.